Whilst deploying FastAPI in cpanel, I had to go through many blog, stackflow and other site and had to read their content. None of them gave me a valid solution but gave some idea how can it be worked.Well, at the last, I found the solution. The solution I am going to elucidate to you with example and screenshot. First of all, you need a control panel(Joke apart). I know you weren’t here until you encounter this problem.
My control panel’s file look like this now.

First I, setup the python App where in python version, I set its version to 3.10.14, I have set the application root to above shown picture path where my content is presented and in application URL I set it to my desire domain and click to create button. After click, it creates a passenger_wsgi.py and other files.
Actually, we don’t need passenger_wsgi.py. It is used when we have WSGI(Web Server Gateway Interface) application but we have ASGI(Asynchronous Server Gateway Interface) application. So, we do not need to concern in this passenger_wsgi.py file. However, we have to stop recently setup application. (Note: copy the virtual activation link we need it to traverse in terminal)
Virtual activation link look like this: “source /home/servername/virtualenv/domainfolder/3.10/bin/activate && cd /home/servername/domainfolder“
We setup this python app. So, it can create virtual environment. Now, we will create simple file name app.py where our content is :
from fastapi import FastAPI
app = FastAPI()
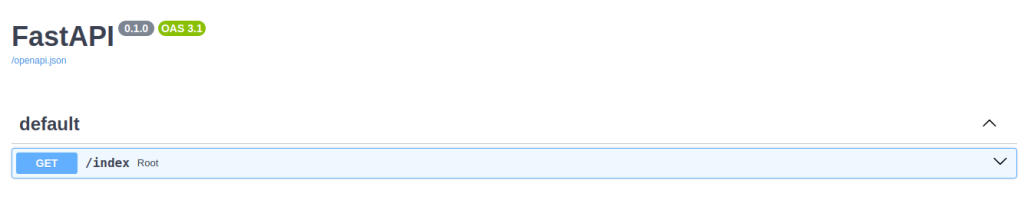
@app.get("/index")
async def root():
return {"message": "Hello World"}After creating a file name app.py we will move to terminal. You can ssh or used control panel terminal its all depends upon you. Now in terminal, above copied virtual activation link we will paste it to terminal so it can activate the virtual environment. After activation, we will install the two main package in order to run FastAPI.
- fastapi
- uvicorn
After installing, this package through pip we run the server through uvicorn in terminal.
uvicorn main:app --host 0.0.0.0 --port 8000
nohup uvicorn main:app --host 0.0.0.0 --port 8000 & (This command is used to run in background. This both command are same but used for different purpose)
Now, we need to write the .htaccess file.To write we need to move to document root URL which is shown in first image.Before rewrite we need to remove present content and rewrite it with this below content.
RewriteEngine On
RewriteCond %{REQUEST_FILENAME} !-f
RewriteCond %{REQUEST_FILENAME} !-d
RewriteRule ^(.*)$ http://127.0.0.1:8000/$1 [P,L]
This rule helps to set up a reverse proxy to your Uvicorn server. All the traffic will be redirect to this uvicorn server.
Now, go to the domain. At main ‘/’ URL, you will encounter the 404 error. As you know there is nothing we going to see in main. To retrieve the API list we have to go “domain.com/docs” which will direct you to API docs.
Now, we have come to the end of blog. Through this step we can run FastAPI in our cPanel. Hope, you will find this blog helpful . If you have any inquiry regarding this topic you can leave me comment below. If you really like my work and want me to keep writing then I need some caffeine to keep up. :):) Thank you for reading this blog and have a nice day.
Thanks a lott…it worked like a charm
searched lot of things before
Thank you for this solution I’l trying to deploy a fastapi in a cpanel.
I think there is a picture missing in the start